セットアップの度に作業する項目
忘れがちなので、自分用作業手順のまとめ。
- 最新版へアップデート
- wbemcli 監視用設定 (Zebbixで利用)
- ハードウェア監視用 CIMインストール
- ESXi 6.7 以降でwbemcli監視が失敗する件の修正
- web client の SSH関係のエラー表示を消す
- ライセンスを追加
- ntpの設定
- Zabbixアクセス用のユーザー作成
(各サーバメーカーのカスタマイズISOで)ESXi をインストールしたらまずは最新版へアップデート。(下記は 6.7u3 向け) 大体日付が一番新しいパッチの ****-standard にアップデートすればいい。これは Dell Customize iso 版だがドライバーが消される事はなかった。他のOSカスタマイズ版でも同様かと。
[root@test:~] esxcli network firewall ruleset set --ruleset-id=httpClient --enabled=true
[root@test:~] esxcli software sources profile list -d https://hostupdate.vmware.com/software/VUM/PRODUCTION/main/vmw-depot-index.xml | sort -r | grep ESXi-6.7
ESXi-6.7.0-8169922-standard       VMware, Inc.  PartnerSupported  2018-04-03T22:07:05  2018-04-03T22:07:05
ESXi-6.7.0-8169922-no-tools       VMware, Inc.  PartnerSupported  2018-04-03T22:07:04  2018-04-03T22:07:04
ESXi-6.7.0-20201104001-standard   VMware, Inc.  PartnerSupported  2020-11-11T12:40:19  2020-11-11T12:40:19
ESXi-6.7.0-20201104001-no-tools   VMware, Inc.  PartnerSupported  2020-11-11T12:40:20  2020-11-11T12:40:20
ESXi-6.7.0-20201103001-standard   VMware, Inc.  PartnerSupported  2020-11-11T12:40:19  2020-11-11T12:40:19
.
.
.
[root@test:~] esxcli software profile update -d https://hostupdate.vmware.com/software/VUM/PRODUCTION/main/vmw-depot-index.xml -p ESXi-6.7.0-20201104001-standard
[root@test:~] esxcli network firewall ruleset set --ruleset-id=httpClient --enabled=false
アップデートの際に下の様なエラーが出る事がある。
[root@test:~]
[InstallationError]
 [Errno 28] No space left on device
       vibs = VMware_locker_tools-light_11.1.1.16303738-16701467
 Please refer to the log file for more details.
その場合には、WebUI から [ホスト] -> [管理] -> [システム] -> [スワップ] と移動し、データストアに任意のデータストアの割当をすれば解決する。

このデータストアの所が指定されていないはずなので、とりあえず datastore1 でも指定してあげれば良い。アップデートが完了したら、元に戻しておけば良いと思う。
次はZabbix監視用作業。
実際のコマンド。
[root@test:~] esxcli system wbem get
   Authorization Model: password
   CIMObject Manager PID: 0
   Enabled: false
   Enabled Running SSLProtocols:
   Enabled SSLProtocols:
   Enabled System SSLProtocols: tlsv1.2
   Loglevel: warning
   Port: 5989
   Service Location Protocol PID: 0
   WSManagement PID: 0
   WSManagement Service: true
[root@test:~] esxcli system wbem set --enable true
[root@test:~] esxcli system wbem get
   Authorization Model: password
   CIMObject Manager PID: 2102567
   Enabled: true
   Enabled Running SSLProtocols: tlsv1.2
   Enabled SSLProtocols:
   Enabled System SSLProtocols: tlsv1.2
   Loglevel: warning
   Port: 5989
   Service Location Protocol PID: 2099334
   WSManagement PID: 2102549
   WSManagement Service: true
次はハードウェアを監視用CIMインストール。
この手順でいいんですが、実際結構変わっていたので上記記事に6.7対応版を補足しました。
最後は、ESXi 6.7 以降でwbemcli監視が失敗する件の修正。
[root@test:~] esxcli software vib remove --vibname=OpenManage
 [NoMatchError]
 No VIB matching VIB search specification 'OpenManage'.
 Please refer to the log file for more details.
最近導入したらopenmanageがインストールされていない…? まぁこんな事もあります。。
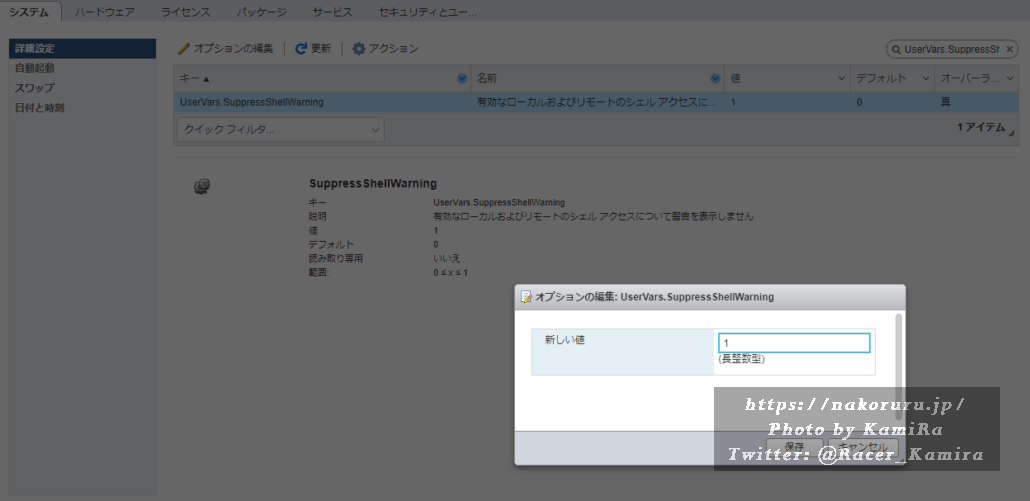
次にweb client の SSH関係のエラー表示を消します。
ログインしたら、管理→システム→詳細設定とクリックし、検索窓に UserVars.SuppressShellWarning と入力します。この値を 0 → 1 にします。

ESXi用のライセンスを入力。ntpの設定、管理→システム→日付と時刻。さくっと終わらせます。
最後にZabbixアクセス用のユーザー作成。
これで一通りの作業が完了する…はずです。