ReadyNAS から B2 Cloud Storage を使いたい
Backblaze B2 Cloud Storage cron backup from ReadyNAS Ultra4.
自宅にある、ReadyNAS Ultra 4。ファームウェアは 4.x 系から 6.x 系へとアップデートして随分長い間使っていますが、未だに壊れずよく動いていると思います。HDDは壊れたら買い替えを繰り返していますし、X-RAIDを利用しているので筐体が壊れない限りは問題ありません。
ただやはりこれ自体のバックアップは取っておきたい。しかし、6.10.1では対応しているクラウドバックアップを確認すると…
- ReadyNAS Vault (1TB/$10/1ヶ月) ※2 GB Max file size
- Amazon Drive (1TB/1,150円/1ヶ月)
- Amazon S3 (1TB/$10/1ヶ月) ※更に転送量課金
- Dropbox (2TB/1,200円/1ヶ月) ※年間払いの場合
- Google Drive (1TB/1,300円/1ヶ月)
- Microsoft Azure (1TB/$20.8/1ヶ月) ※操作課金有
- Microsoft OneDrive (1TB/2,240円/1ヶ月)
- Wasabi (1TB/$5.99/1ヶ月)
こんな感じです。Wasabiがダントツでお安いのでコレを使おう!……というと話が終了してしまうので、今回は B2 Cloud Storage を使ってみようと思います。
B2 Cloud Storage は2015年当時、Amazon S3の1/4のコストという事で話題になりました。実際に価格を見てみると、1GBあたり$0.005、つまり1TBで$5です。これは Wasabi より安いです。但し、ダウンロード課金があるので万が一ダウンロードをする事になると、GB単価で$0.01掛かります。とは言え保険してのバックアップであれば問題無く「本当に全てを失った時に取り戻せる」のは心強いと思います。実際にNASが壊れる状況を結構見てきています。単純な電源故障であれば直せるかも知れませんが、それも保証が無くなった筐体では期待できません。(余談ですが、Ultra4とかDuoの電源を独自で直した経験もあります)
B2 Cloud Storage を使う為には
※ 作業をする際には、念の為全てをバックアップしてから作業してください!この作業をすると保証が無くなります
※ 一切の責任は負いませんので、各自のご判断で作業してください!
とは言え、もうUltra4なんて保証も何も無いんですけれどね(笑)
これはReadyNASがDebian系OSだからこそできる技です。
簡単に手順を説明するとこんな感じです。(※最低限Linuxの知識は必要なので何を言っているか判らなければ、素直にWasabiでも使ってください)
- SSHでアクセス可能にする(保証が切れます)
- SSHでrootログインし、apt-get で必要なモジュールをインストールする
- duplicity 0.7 以上をソースからコンパイルしてインストールする
- Python の B2系ライブラリをインストールする
- B2 Cloud Storage Buckets でバケット(入れ物)を作成する
- Application Keys で duplicity 用のAPP key を作成する
- duplicity で対象ディレクトリをクラウドへアップロードテストを行う
- シェルスクリプトを組んで cron へ登録して完了
手順
1. RAIDiator 4.2 の頃は bin を導入する方法でSSHアクセス可能となったのですが、RAIDiator 6系ではWEBから設定が可能です。
2. SSHでログインします。必要なライブラリはこんな感じです。
# apt-get install software-properties-common
# apt-get update
# apt-get install build-essential libssl-dev libffi-dev python-dev librsync-dev

# cd
# wget "https://bootstrap.pypa.io/get-pip.py"
# python get-pip.py
# pip install fasteners
大体は apt-get で導入可能です。途中から Python を使うので、pip をインストールしています。pip経由で fasteners をインストールします。(duplicityの動作に必要)
3. duplicity は 0.7系と0.8系がありますが、ReadyNAS自体のOSが古いので0.7系で動作させるようにしました。
# wget "https://launchpad.net/duplicity/0.7-series/0.7.19/+download/duplicity-0.7.19.tar.gz"
# tar zxvf duplicity-0.7.19.tar.gz
# cd duplicity-0.7.19
# python setup.py install
これでインストール完了です。動作させてみるとこんな感じ。
root@TESTNAS:~/duplicity-0.7.19# /usr/local/bin/duplicity --version
duplicity 0.7.19
path は /usr/local/bin/duplicity に入るので注意。
4. は Python で B2 cloud へアクセスする為に必要なモジュールをインストールする作業です。
# cd
# apt-get install python-pexpect python-urllib3 python-oauthlib
# pip install b2
比較的簡単でした。
5. B2 Cloud Storage Buckets を作成します。Backblaze へのアカウント登録の仕方は割愛します。(この位できないとトラブルが起きた際に対応ができないので)

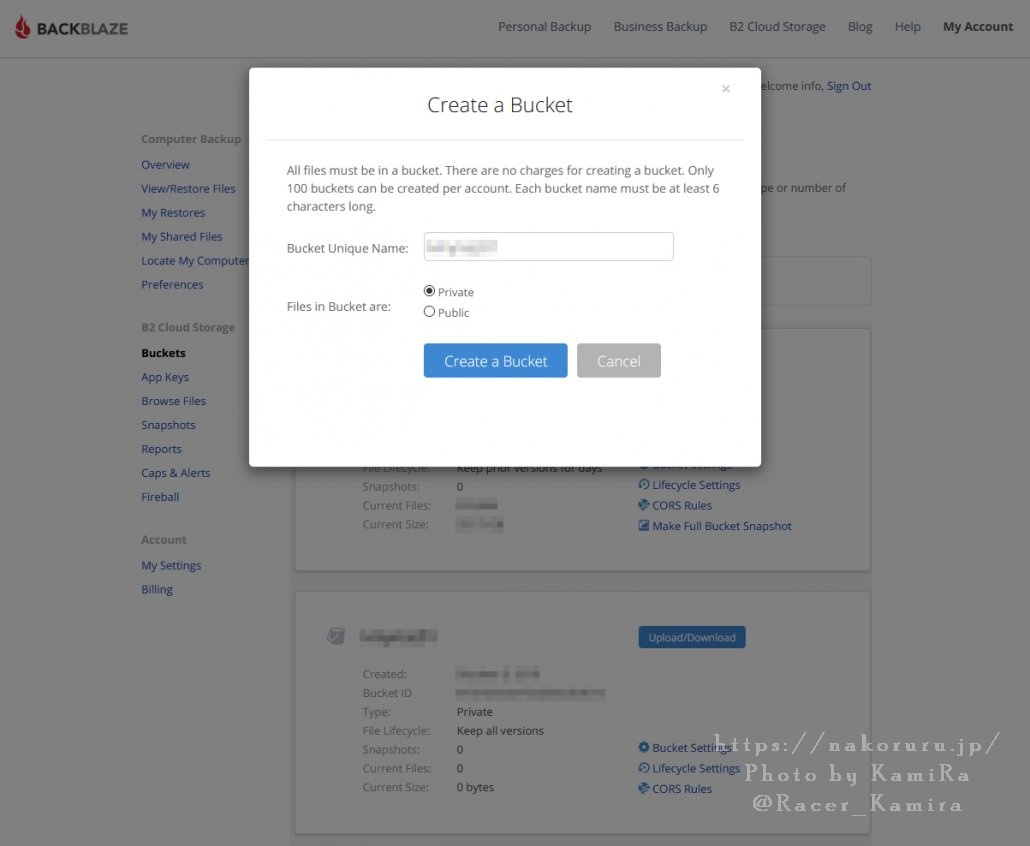
[Buckets] から [Create a Bucket]を選択し、Bucket Unique Name: には好きな名前を付けてください。勿論半角英数字でお願いします。Files in Bucket are はそのまま Private で大丈夫です。

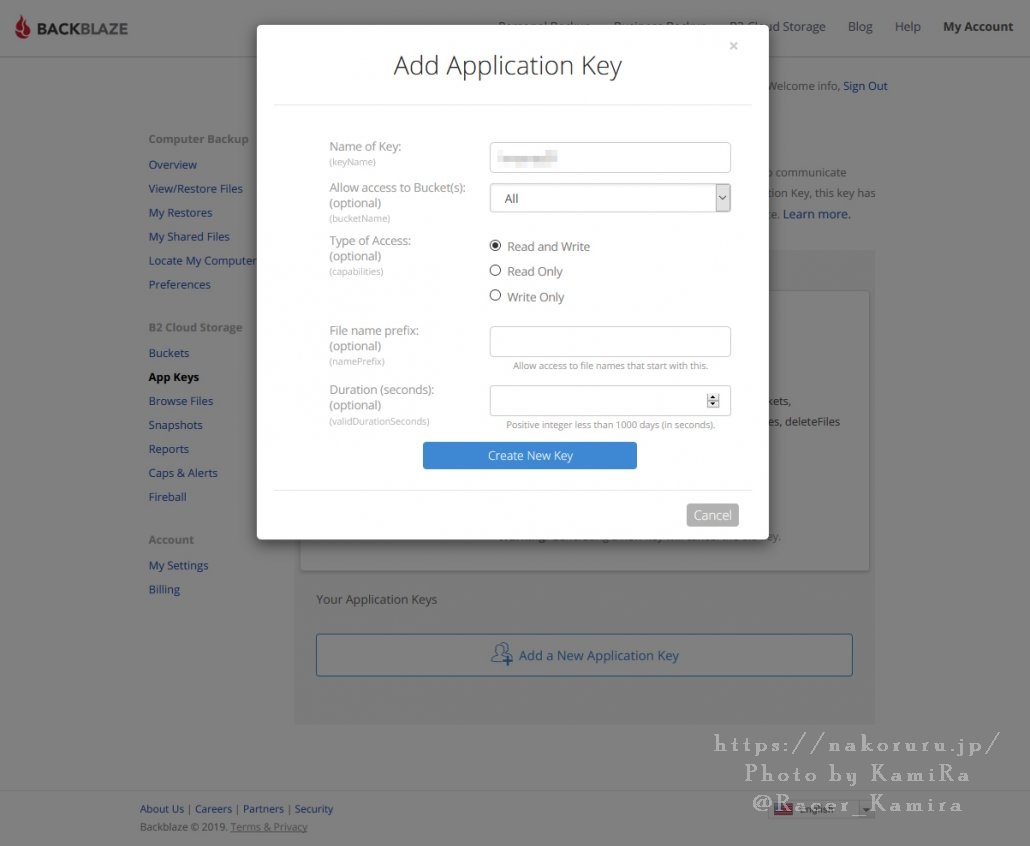
6. Application Keys で duplicity 用のAPP key を作成します。[App Keys]から[Add a New Application Keykey]を選択します。 Name of Key は適宜半角英数字でつけてください。Allow access to Bucket(s): は先程作成した Buckets の名前を選択します。Type of Accessは Read and Write で良いと思います。あとは空欄で構いません。

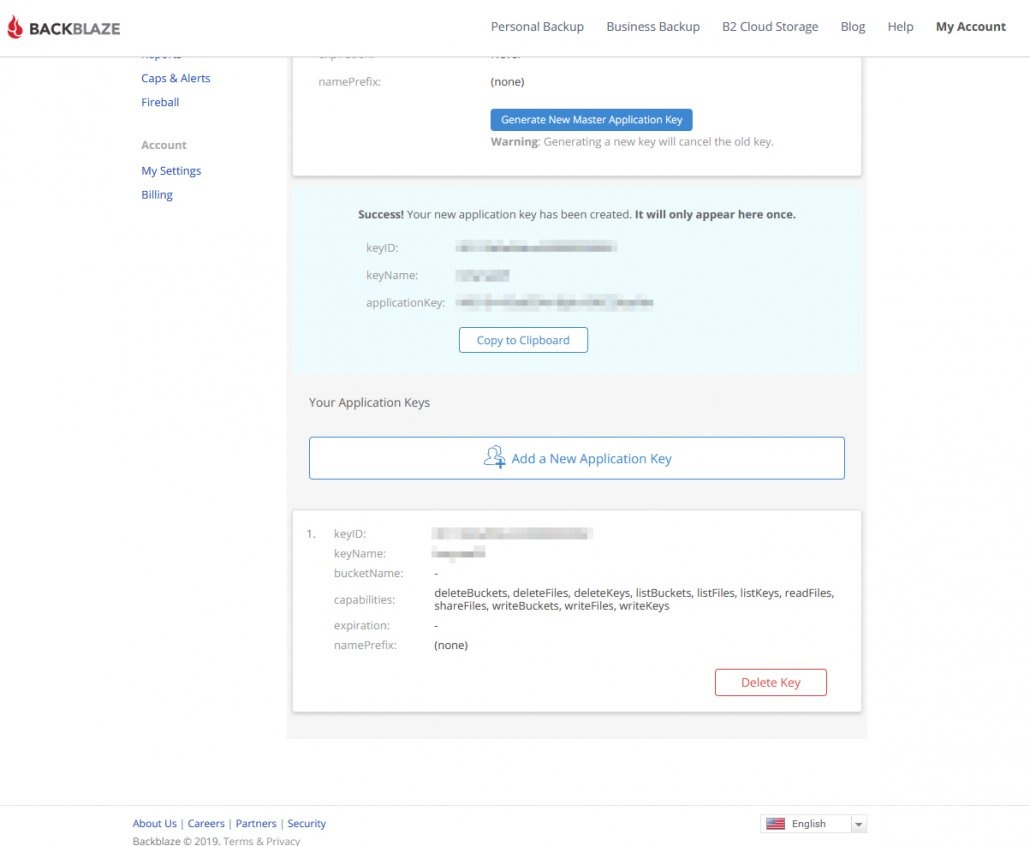
作成すると、KeyID と KeyName 、applicationKey が発行されます。これはとても大切なのでメモするなり保存しておいてください。この発行されたキーを利用してアップロードします。
7. SSHの画面へ戻り、duplicity で動作確認をしてみます。コマンドはこんな感じです。ちなみに ReadyNAS上のデータは、すべて /data 以下にありますので、そこを指定します。例では、 /data/test 以下をアップロードするようにしています。
[例]
/usr/local/bin/duplicity /data/test b2://[keyID]:[application key]@[B2 bucket name]
自分の環境だとこんな感じになります。KeyIDとかApplication keyはそれぞれ発行されたものを利用してください。このコマンドをそのまま打っても当然動作する訳がありませんのでご注意を。
/usr/local/bin/duplicity /data/test b2://1234567890abcdefghijklmno:nGfcj98CSVLeq5sWb1H0W6bv86iu7Wr@testnas01

--------------[ Backup Statistics ]--------------
StartTime 1133074801.81 (Fri Sep 27 01:00:01 2019)
EndTime 1133074927.82 (Fri Sep 27 01:02:07 2005)
ElapsedTime 126.01 (2 minutes 6.01 seconds)
SourceFiles 3446
SourceFileSize 27195497 (25.9 MB)
NewFiles 3446
NewFileSize 27195497 (25.9 MB)
DeletedFiles 0
ChangedFiles 0
ChangedFileSize 0 (0 bytes)
ChangedDeltaSize 0 (0 bytes)
DeltaEntries 3446
RawDeltaSize 27018423 (25.8 MB)
TotalDestinationSizeChange 6865063 (6.55 MB)
Errors 0
-------------------------------------------------
こんな感じでテストが完了しました。下記戻す時はパス指定を逆にすれば良いです。
/usr/local/bin/duplicity b2://1234567890abcdefghijklmno:nGfcj98CSVLeq5sWb1H0W6bv86iu7Wr@testnas01 /data/test
これで、/data/test 以下に下記戻しできます。このコマンドさえ覚えておけば、いづれ ReadyNASを離れて別のLinuxなりにクローンを作る時も、同じコマンドを叩けば、B2 Cloud Storage から任意の場所へ書き戻す事も可能です。
ちなみに、ファイルは全て暗号化された状態で分割してアップロードされています。 より安全だと思いますが、Browseでファイルを見たり直ぐに取り出したいという時は若干不便ですがそういうモノです。
8. 最後にシェルスクリプトを組んで cron へ登録します。
# vi b2-duplicity-operation.sh
//-----------------------------------------------------
#!/bin/bash
export PASSPHRASE=Tt3q3iVfTGEHj6ICHVeoD

keyID=1234567890abcdefghijklmno
application_key=nGfcj98CSVLeq5sWb1H0W6bv86iu7Wr
B2_bucket_name=testnas01
count=2

if [ "$1" = "backup" ]
then
    echo "Upload from local ReadyNAS to Backblaze B2 cloud storege..."
    /usr/local/bin/duplicity \
    --progress \
    $2 b2://$keyID:$application_key@$B2_bucket_name
    sleep 1
    /usr/local/bin/duplicity \
    remove-all-but-n-full $count \
    --progress \
    b2://$keyID:$application_key@$B2_bucket_name
    echo "$count Generations ago deleted..."
elif [ "$1" = "restore" ]
then
    echo "Download from Backblaze B2 cloud storege to local ReadyNAS..."
    /usr/local/bin/duplicity \
    --progress \
    b2://$keyID:$application_key@$B2_bucket_name $2
else
    echo "command: b2-duplicity-opertion.sh [backup/restore] [localpath]"
fi
//-----------------------------------------------------
# chmod 755 ./b2-duplicity-operation.sh
とこんな感じでシェルスクリプトを書いてみました。keyID , application_key , B2_bucket_name は各自任意で変更してください。
あとはシェルスクリプトの後ろに引数で、backup か restore を記載し、バックアップしたいディレクトリのパスを指定すれば利用可能です。
[Backup]
# /root/b2-duplicity-operation.sh backup /data/test

[Restore]
# /root/b2-duplicity-operation.sh restore /data/test
これでアップロード・ダウンロードをする事が可能です。実行時に進捗表示させたくなければ、–progress \ の行を削ってください。あとはいつも通りに、cronへ登録します。毎朝3時に実行したければ、これで大丈夫です。
# crontab -e
0 3 * * * /root/b2-duplicity-operation.sh backup /data/test >/dev/null 2>&1
但し、最初の1回はフルバックアップを取るので、容量次第ではとてつもなく時間が掛かります。ご注意を。duplicity のオプションはこんな感じですが、特に覚えなくて良いと思います。
# /usr/local/bin/duplicity --help
Usage:
  duplicity [full|incremental] [options] source_dir target_url
  duplicity [restore] [options] source_url target_dir
  duplicity verify [options] source_url target_dir
  duplicity collection-status [options] target_url
  duplicity list-current-files [options] target_url
  duplicity cleanup [options] target_url
  duplicity remove-older-than time [options] target_url
  duplicity remove-all-but-n-full count [options] target_url
  duplicity remove-all-inc-of-but-n-full count [options] target_url

Backends and their URL formats:
  cf+http://container_name
  file:///some_dir
  ftp://user[:password]@other.host[:port]/some_dir
  ftps://user[:password]@other.host[:port]/some_dir
  hsi://user[:password]@other.host[:port]/some_dir
  imap://user[:password]@other.host[:port]/some_dir
  rsync://user[:password]@other.host[:port]::/module/some_dir
  rsync://user[:password]@other.host[:port]/relative_path
  rsync://user[:password]@other.host[:port]//absolute_path
  s3://other.host[:port]/bucket_name[/prefix]
  s3+http://bucket_name[/prefix]
  scp://user[:password]@other.host[:port]/some_dir
  ssh://user[:password]@other.host[:port]/some_dir
  swift://container_name
  tahoe://alias/directory
  webdav://user[:password]@other.host/some_dir
  webdavs://user[:password]@other.host/some_dir
  gdocs://user[:password]@other.host/some_dir
  pydrive://[email protected]/some_dir
  mega://user[:password]@other.host/some_dir
  copy://user[:password]@other.host/some_dir
  dpbx:///some_dir
  onedrive://some_dir
  azure://container_name
  b2://account_id[:application_key]@bucket_name/[some_dir/]
  mf://user[:password]@other.host/some_dir

Commands:
  cleanup <target_url>
  collection-status <target_url>
  full <source_dir> <target_url>
  incr <source_dir> <target_url>
  list-current-files <target_url>
  restore <source_url> <target_dir>
  remove-older-than <time> <target_url>
  remove-all-but-n-full <count> <target_url>
  remove-all-inc-of-but-n-full <count> <target_url>
  verify <target_url> <source_dir>

Options:
  -h, --help            show this help message and exit
  --allow-source-mismatch
  --archive-dir=path
  --asynchronous-upload
  --compare-data
  --copy-links
  --dry-run
  --encrypt-key=gpg-key-id
  --encrypt-secret-keyring=path
  --encrypt-sign-key=gpg-key-id
  --exclude=shell_pattern
  --exclude-device-files
  --exclude-filelist=filename
  --exclude-if-present=filename
  --exclude-other-filesystems
  --exclude-regexp=regular_expression
  --exclude-older-than=time
  --extra-clean
  --file-prefix=FILE_PREFIX
  --file-prefix-manifest=FILE_PREFIX_MANIFEST
  --file-prefix-archive=FILE_PREFIX_ARCHIVE
  --file-prefix-signature=FILE_PREFIX_SIGNATURE
  -r path, --file-to-restore=path
  --force
  --ftp-passive
  --ftp-regular
  --full-if-older-than=time
  --gio
  --gpg-binary=path
  --gpg-options=options
  --hidden-encrypt-key=gpg-key-id
  --ignore-errors
  --imap-full-address
  --imap-mailbox=imap_mailbox
  --include=shell_pattern
  --include-filelist=filename
  --include-regexp=regular_expression
  --log-fd=file_descriptor
  --log-file=filename
  --max-blocksize=number
  --name=backup name
  --no-encryption
  --no-compression
  --no-print-statistics
  --null-separator
  --num-retries=number
  --numeric-owner
  --old-filenames
  --metadata-sync-mode=METADATA_SYNC_MODE
  --par2-redundancy=number
  --par2-options=options
  --progress
  --progress-rate=number
  --pydevd
  --rename=RENAME
  -t time, --restore-time=time, --time=time
  --rsync-options=options
  --s3-european-buckets
  --s3-use-rrs
  --s3-use-ia
  --s3-use-new-style
  --s3-unencrypted-connection
  --s3-multipart-chunk-size=number
  --s3-multipart-max-procs=number
  --s3-multipart-max-timeout=number
  --s3-use-multiprocessing
  --s3-use-server-side-encryption
  --scp-command=command
  --sftp-command=command
  --cf-backend=pyrax|cloudfiles
  --short-filenames
  --sign-key=gpg-key-id
  --ssh-askpass
  --ssh-options=options
  --ssl-cacert-file=pem formatted bundle of certificate authorities
  --ssl-cacert-path=path to a folder with certificate authority files
  --ssl-no-check-certificate
  --tempdir=path
  --timeout=seconds
  --time-separator=char
  --use-agent
  -v [0-9], --verbosity=[0-9]
  -V, --version
  --volsize=number
  --backend-retry-delay=seconds
ReadyNASは非常に便利かつ、とても安い上に安定しています。自分の環境では既に6年以上動作させたままですが、HDDの故障以外で壊れた事はありません。有効に使っていけると良いですね。